An organized freezer means you won’t accidentally buy the third loaf of bread this month when you have two already. It means quicker and easier meals that don’t leave you absolutely drained when looking for the ingredients. So why is it so hard to keep the freezer organized? The thick boxes and odd angles of most freezers are a huge reason for the chaos that ensues when thinking about the organizing process. I’ve found 5 easy steps to make any and all freezers feel more organized and useful.
- Empty and Clean
- Take Inventory
- Create Zones
- Only Stack with Like Items
- Put Most-used Items in the Door
Empty and Clean
Freezers can quickly turn into an abyss because we tend to stack foods, freeze things vertically, and forget how long things have been frozen. I started by pulling everything out of the freezer, wiping down all of the doors, and cleaning the bins individually. Starting with an empty freezer will let you map out your next moves quickly.
Take Inventory
After pulling everything out of the freezer, I laid it all out on the counter and started to assess how many items I had and how they would best fit into the bins and drawers. I took this time to also look at the expiration dates to make sure everything was still fresh and good to eat. Find the right container for the different items that you have.
Create Zones
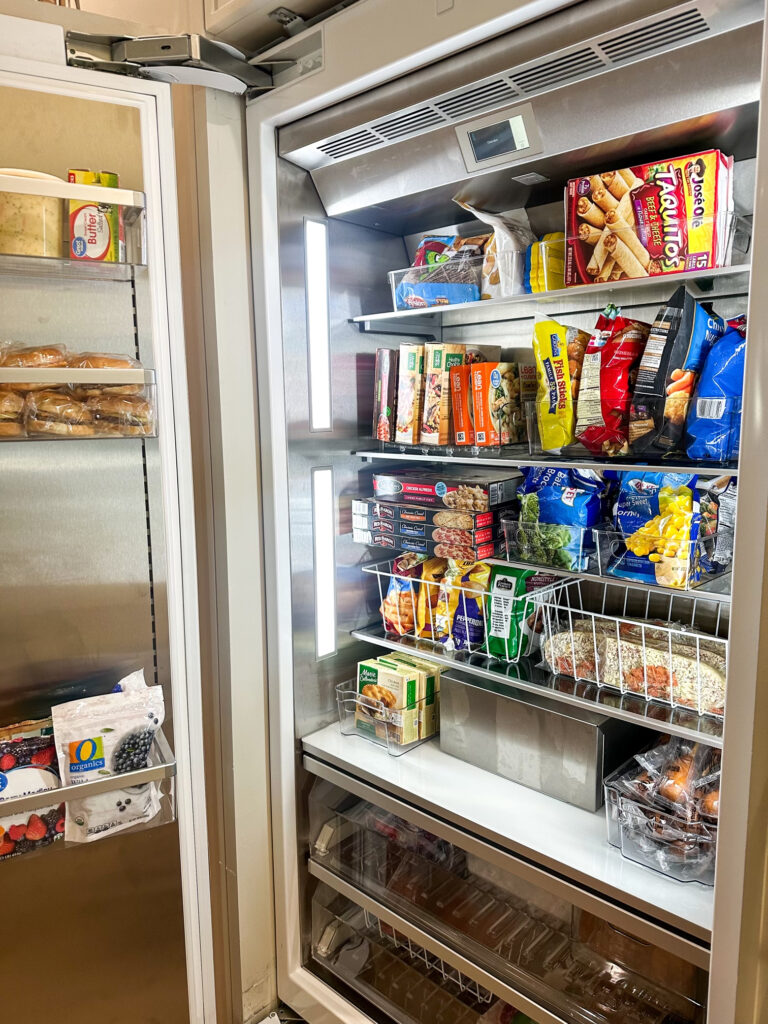
Being realistic and knowing what you reach for the most can help you decide how you are going to organize your zones. Use clear bins to create a drawer structure where you can see everything when it is in its place. Organizing your freezer by zones will make it easier to take inventory before heading to the grocery store. Good zones to start with: Meats, Pizzas, Frozen Meals, Fruits & Veggies.
When it comes to zones, there are a few things to keep in mind. 1. Placing your meat on the bottom shelf is crucial to minimize a mess in the event that a package leaks. 2. The door is the warmest part of the freezer which means it’s perfect for the breakfast sandwiches that we go through like crazy. I chose to go with these drawers on the lower rack because they’re easy to pull out with larger items inside of them like pizza rolls and fries. I went with this fridge separator for my quick meals because they’re sold in individual boxes. For sides like corn and broccoli, I went with these bins because I will not need to see all of the bags inside as they’re all like items.
Only Stack with Like Items
Freezers are known for being a chaotic mess with items stacked to the brim. While it is okay to stack some items on top of each other, it is important to only stack with like items. Digging through the bins to figure out what you even put there in the first place defeats the purpose of organizing!
Put Most-used Items in the Door
Along with using the door for quick items like breakfast sandwiches, this door is perfect for any items that you use daily or extremely often. If you have 5 kids like us, time is of the essence and any second we can get back is worth it. I ended up putting my fruits for smoothies in the bottom drawer, my breakfast sandwiches above, and then the other crucial items like Eggo Waffles for early mornings.
How to keep your freezer from being clustered again?
Life happens. I typically set aside one day of the week to check on the freezer and fridge to check inventory and the status of the items. Setting aside the time weekly for quick cleanups and restocks makes such a distance when going into each week and anticipating which items you’ll need. This will prevent those days where it feels like you have to clean it all out and start again!